今天开始给大家分享Java相关的技术开发知识,在以后的开发和学习中,还希望大家多多指教,对于我发表的相关内容,如有错误,请大家指出来,一起学习。 更要记住这句话:Stay Hungry, Stay Foolish.
一、Redis的安装
为了方便教程这里先简单介绍Redis的安装。
1. windows平台的安装
现在官网已经不提供windows平台的下载,所以只能去github上下载安装 github下载网址 进入之后选择好版本点击msi下载 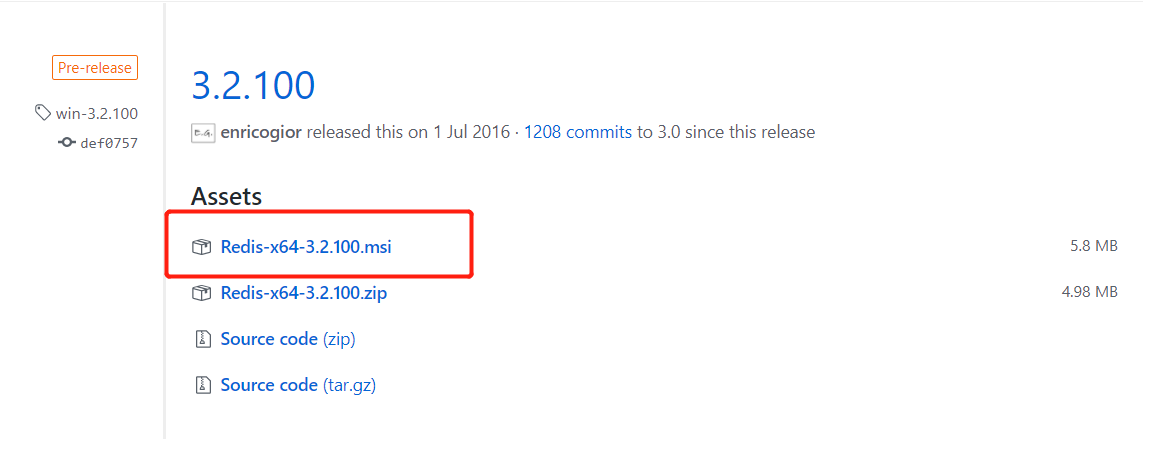 然后双击安装。 默认是直接运行的。 可以通过控制台访问如
 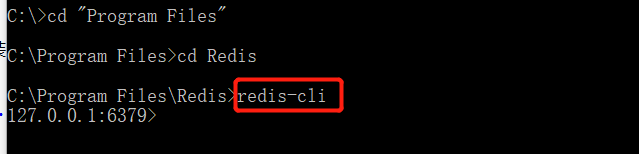 具体语法可以在相关网上查阅。 ### 2. Linux平台的安装 直接到官网下载 Redis.io 解压并安装
 1
2
3
4wget http://download.redis.io/releases/redis-4.0.9.tar.gz
tar xzf redis-4.0.9.tar.gz
cd redis-4.0.9
make
服务端运行脚本 1
src/redis-server
客户端运行脚本 1
src/redis-cli
3. SpringBoot2.0相关配置
pom文件加入以下依赖 1
2
3
4<dependency>
<groupId>org.springframework.boot</groupId>
<artifactId>spring-boot-starter-data-redis</artifactId>
</dependency>
我这里SpringBoot的配置文件使用的是YAML。 在相应环境中配置Redis ##### application-local.yml 1
2
3
4
5
6
7
8
9
10
11
12
13
14
15
16
17spring:
datasource:
name: test
driverClassName: com.mysql.jdbc.Driver
url: jdbc:mysql://127.0.0.1:3306/local?useUnicode=true&characterEncoding=UTF-8
username: root
password: root
redis:
database: 0
host: localhost
port: 6379
jedis:
pool:
min-idle: 0
max-idle: 8
max-active: 8
max-wait: -1ms
4.代码级别配置
1 | import com.xxx.controller.entry.entity.AccessToken; |
缓存对象AccessToken 1
2
3
4
5
6
7
8
9
10
11
12
13
14
15
16
17
18
19
20import lombok.Data;
import org.springframework.data.annotation.Id;
import org.springframework.data.redis.core.RedisHash;
import org.springframework.data.redis.core.TimeToLive;
/**
* @Author :yaxuSong
* @Description:
* @Date: 14:26 2018/4/18
* @Modified by:
*/
("accessToken")
public class AccessToken {
String id;
String accessToken;
Long expire;
}
创建Respository 1
2
3
4
5
6
7
8
9
10
11
12
13
14
15import com.xxx.controller.entry.entity.AccessToken;
import org.springframework.data.repository.CrudRepository;
import org.springframework.stereotype.Repository;
/**
* @Author :yaxuSong
* @Description:
* @Date: 14:34 2018/4/18
* @Modified by:
*/
// 继承自CURD,里边有最基本的方法
public interface AccessTokenRepository extends CrudRepository<AccessToken, String> {
}
接下来完成自己的业务服务类 1
2
3
4
5
6
7
8
9
10
11
12
13
14
15
16import com.xxx.controller.entry.entity.AccessToken;
/**
* @Author :yaxuSong
* @Description:
* @Date: 14:50 2018/4/18
* @Modified by:
*/
public interface AccessTokenService {
AccessToken save(AccessToken accessToken);
void delete(AccessToken accessToken);
AccessToken get(String id);
}
业务服务类的实现 1
2
3
4
5
6
7
8
9
10
11
12
13
14
15
16
17
18
19
20
21
22
23
24
25
26
27
28
29
30
31
32
33
34
35
36import com.xxx.controller.entry.entity.AccessToken;
import com.xxx.dao.repository.AccessTokenRepository;
import com.xxx.service.AccessTokenService;
import org.springframework.beans.factory.annotation.Autowired;
import org.springframework.stereotype.Service;
import java.util.Optional;
/**
* @Author :yaxuSong
* @Description:
* @Date: 14:52 2018/4/18
* @Modified by:
*/
("accessTokenService")
public class AccessTokenServiceImpl implements AccessTokenService {
private AccessTokenRepository repo;
public AccessToken save(AccessToken accessToken) {
return repo.save(accessToken);
}
public void delete(AccessToken accessToken) {
repo.delete(accessToken);
}
public AccessToken get(String id) {
Optional<AccessToken> accessToken = repo.findById(id);
return accessToken.orElse(null);
}
}
以上完成了整个整合过程。 ### 5. 简单的测试 1
2
3
4
5
6
7
8
9
10
11
12
13
14
15
16
17
18
19
20
21
22
23
24
25
26
27
28
29
30
31
32
33
34import com.xxx.controller.entry.entity.AccessToken;
import com.xxx.service.AccessTokenService;
import org.springframework.beans.factory.annotation.Autowired;
import org.springframework.web.bind.annotation.RequestMapping;
import org.springframework.web.bind.annotation.RestController;
/**
* @Author :yaxuSong
* @Description:
* @Date: 15:16 2018/4/18
* @Modified by:
*/
("test")
public class TestController {
private AccessTokenService accessTokenService;
("add")
public String test(){
AccessToken accessToken = new AccessToken();
accessToken.setAccessToken("dadaadadsdadewqeqfskksdbfdbkfsdkdajdhwke2elhsbcslc/DNDAWDAWWAFEWFSD23E2342");
accessToken.setExpire(60L);
//单位 秒
AccessToken at = accessTokenService.save(accessToken);
return "成功"+"键值为:"+at.getId();
}
("get")
public String get(String id){
AccessToken accessToken = accessTokenService.get(id);
return accessToken==null?"已过期":accessToken.toString();
}
}
测试结果:

我这里添加了一个过期时间为60s的token。 我们通过查看可以看到时间的变化
第一次查询:  第二次查询:
  第三次查询:
我们查看下本地Rdis所有键值情况:  过一段时间后查询:
 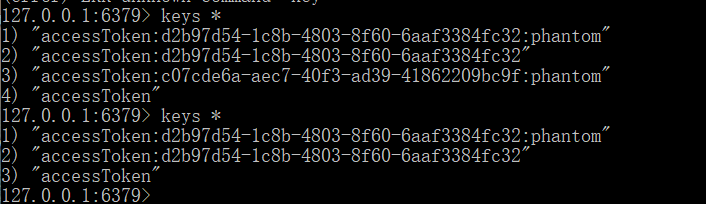 我们发现之前还存在键值id为c07cde6a-aec7-40f3-ad39-41862209bc9f的,但是内容没有了。 后来查询的就被删除了(过期后不会直接删除,会稍有延迟,只有id存在,其他都已被删除)
我们看到键值为:d2b97d54-1c8b-4803-8f60-6aaf3384fc32的是我之前存的TTL=7200s的。 
至此所有相关的内容就介绍完了。
本文参考地址:Spring-data-redis